AdGuard DNS is a free DNS service designed to block intrusive ads and protect your devices from online threats. Instead of using the default DNS servers provided by your internet service provider, you can switch to AdGuard DNS to filter malicious content right from the first connection. This not only enhances your browsing speed but also improves your online privacy and security.
In this article, Antidetect Browser Hidemium will explore in detail what AdGuard DNS is and provide step-by-step instructions for setting it up on various devices, including computers, Android phones, and iPhones.
1. What is AdGuard DNS?
AdGuard DNS is a DNS solution developed by the security company AdGuard, which allows users to:
Block ads in browsers and apps.
Prevent access to malicious, phishing, or spyware-infected websites.
Improve page load speed by eliminating unnecessary ad content.
Protect personal data, as AdGuard promises not to store users' DNS query history.
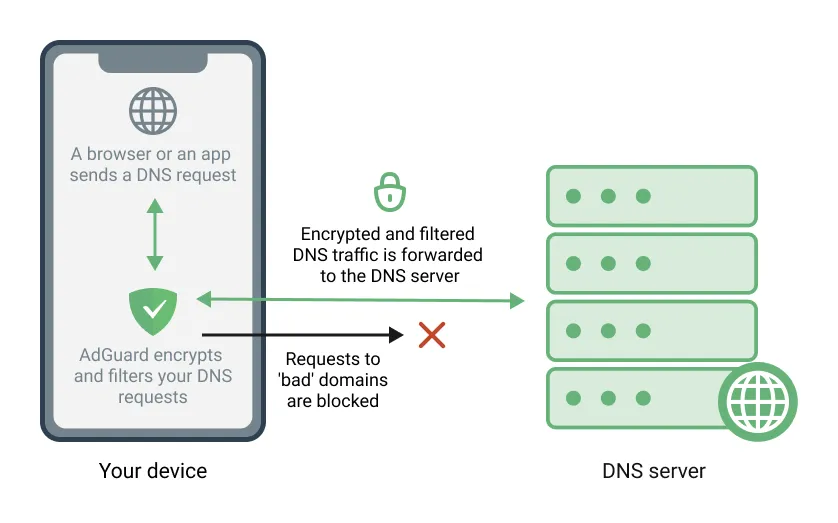
When your device is configured to use AdGuard DNS servers, all your internet traffic is filtered through AdGuard’s system before reaching the target website. This helps reduce the risk of tracking, malware infections, and personal data theft while browsing online.
2. What are the Pros and Cons of AdGuard DNS?
AdGuard DNS is a highly-rated solution for blocking ads and protecting personal data while browsing the Internet. However, like many DNS services, it comes with both advantages and some limitations. The table below will help you better understand and make an informed decision:
Key Advantages | Considerable Limitations |
| Easy to set up: No need to install additional software or apps – just change your DNS settings and you're good to go. | Cannot block all ads: The free version is not powerful enough to eliminate all web ads. |
| Free and open-source: Users can enjoy the service at no cost, ideal for basic needs. | Some websites are restricted: Sites that require ad-blockers to be disabled may become inaccessible. |
| Enhanced security: Supports modern encryption protocols like DNSCrypt, DNS-over-TLS, and DNS-over-HTTPS to keep personal data safe. | Affects website layout: Blocking ads may leave blank spaces that impact website aesthetics. |
| Content control: Offers two modes – standard and family – to help parents manage children’s internet usage. | Only one free option available: Users can choose either DNS or VPN, not both simultaneously unless upgraded. |
| Device compatibility: Works smoothly across smartphones, tablets, and computers. | Limited advanced features: To unlock full functionality, a premium subscription is required. |
| No data collection: AdGuard DNS commits to not logging browsing history or storing user data. | |
| Speeds up browsing: Ad blocking helps improve page load times. |
AdGuard DNS is a solid choice if you're looking for a free, user-friendly tool to enhance browsing privacy and security. However, for more comprehensive ad-blocking and advanced features, upgrading to a paid plan or combining with a VPN service is recommended.

3. AdGuard DNS Modes: Flexible and Comprehensive Security for Users
AdGuard DNS is not just an ad-blocking tool — it offers various flexible modes, allowing users to tailor their settings to control accessible content and enhance online security. Here are the key modes you can choose from:
Default Mode: This is AdGuard DNS’s standard setting, which automatically blocks ads, malware, and harmful websites, providing a safer browsing experience.
Family Protection Mode: Specially designed for households with children, this mode filters out inappropriate content like adult websites or harmful media, ensuring a safer Internet environment for kids.
No Filtering Mode: If you prefer unrestricted Internet access, this mode disables all filters and allows you to access any content without interference.
Custom Mode: For advanced users, this mode allows you to manually set up lists of websites to block or allow, giving you complete control over your browsing experience.Encrypted DNS Mode (DNS-over-HTTPS/DNS-over-TLS): Enhances privacy by encrypting DNS queries, preventing third parties from tracking your online activity — particularly useful when connected to public Wi-Fi.
DNS Query Log Mode: When enabled, this feature records your DNS query history, allowing you to monitor and track network activity transparently.
In summary, AdGuard DNS offers high customization and is suitable for a variety of needs — from individual users to families, from basic to advanced settings. Choosing the right mode helps you manage your Internet access, protect your data, and enjoy a better browsing experience every day.
4. How to Set Up AdGuard DNS on Your Computer
If you want to speed up your internet connection and enhance your web security, AdGuard DNS is a great option to consider. Setting up AdGuard DNS on operating systems like Windows, macOS, or Ubuntu is straightforward. Here's a step-by-step guide for Windows users:
4.1. How to Configure AdGuard DNS on Windows
You can easily configure AdGuard DNS on your Windows PC by following these steps:
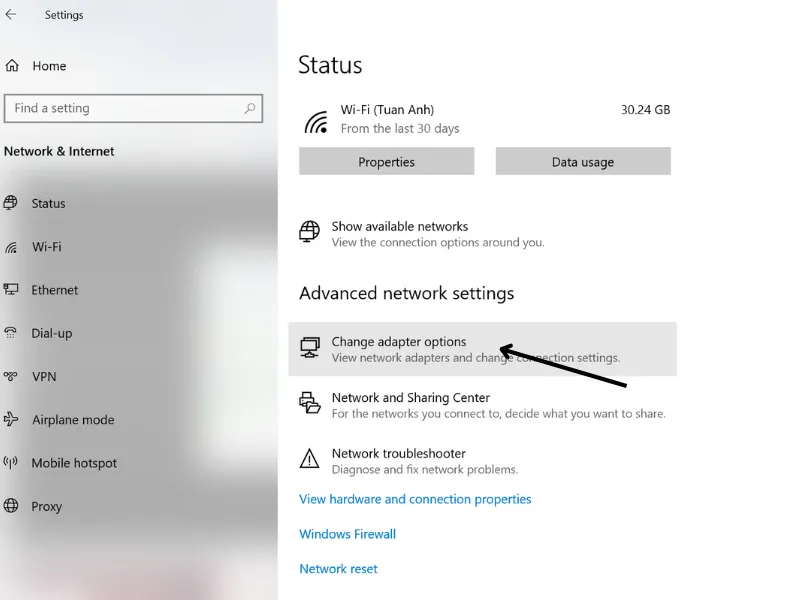
Step 1: Access Network Settings
Right-click on the network icon in the bottom-right corner of the taskbar and select "Open Network & Internet settings". Then go to "Network and Internet" and choose "Change adapter options".
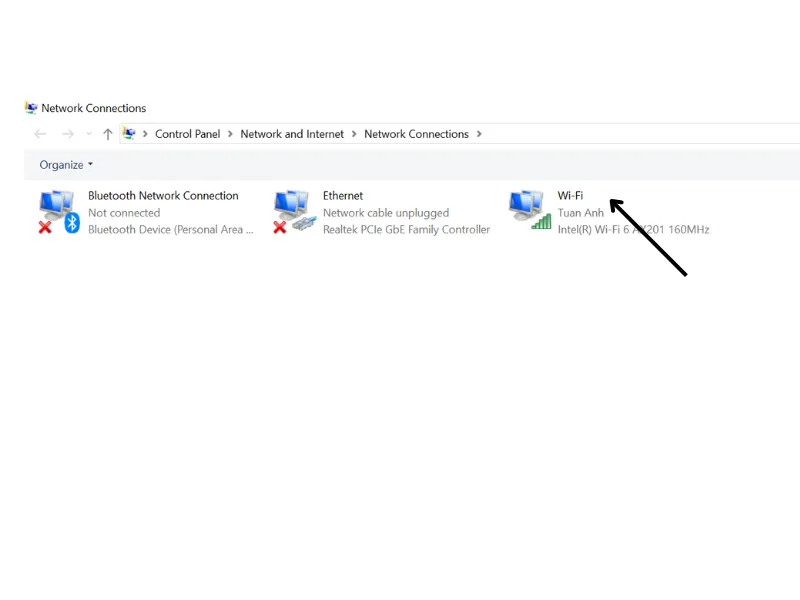
Step 2: Select Your Active Network Connection
In the list of connections, right-click on your active connection (Wi-Fi or Ethernet) and select "Change settings of the connection" to open advanced settings.
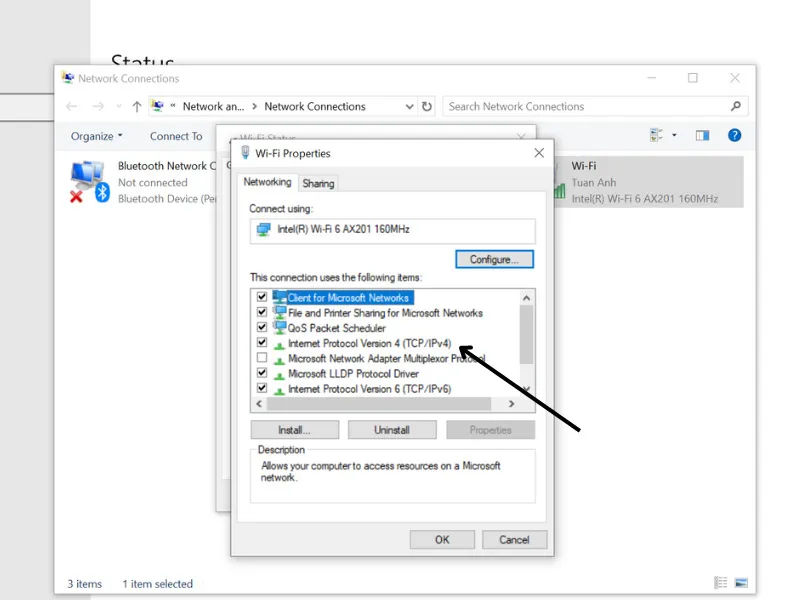
Step 3: Set AdGuard DNS Addresses
Select Internet Protocol Version 4 (TCP/IPv4) and click Properties. In the "Use the following DNS server addresses" section, enter the following AdGuard DNS servers:
- Primary: 176.103.130.130
- Secondary: 176.103.130.131
Step 4: Save and Finish
Click OK, then Close to save changes and complete the configuration.
4.2. How to Set Up AdGuard DNS on macOS
If you're using a MacBook and want to block ads, enhance browsing speed, or improve privacy, AdGuard DNS is an excellent choice. Follow these detailed steps to set it up:
Step 1: Open network settings
Go to System Settings (or System Preferences for older macOS versions), then select Network.
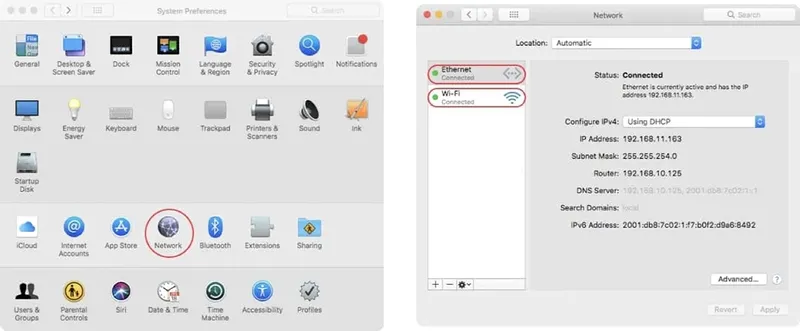
Step 2: Choose the network connection
Select the Wi-Fi or Ethernet connection you want to configure. Click Advanced, then switch to the DNS tab.
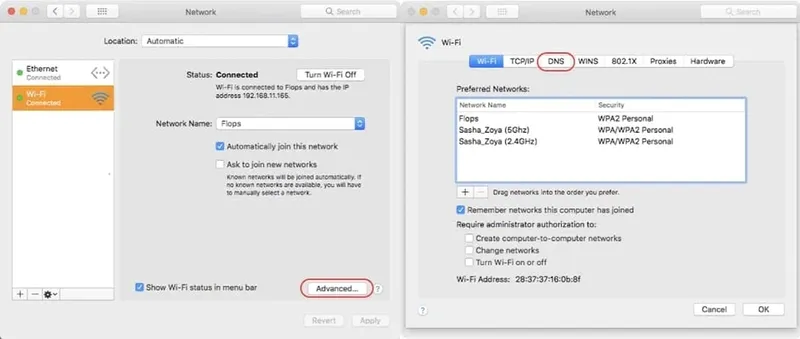
Step 3: Add AdGuard DNS addresses
Click the + icon and add the following DNS addresses:
- Primary server: 176.103.130.130
- Secondary server: 176.103.130.131
Step 4: Save the configuration
Click OK to save the changes and complete the setup.
4.3. Setting Up AdGuard DNS on Ubuntu
For Ubuntu users, configuring AdGuard DNS helps block ads, protect privacy, and optimize web browsing. Here's how to do it:
Step 1: Open network settings
Go to Settings and select Network.
Step 2: Choose your network connection
Click the active Wi-Fi or Ethernet connection you want to configure.
Step 3: Set up DNS addresses
Switch to the IPv4 tab, choose Automatic (DHCP) addresses only, and enter the following:
- Primary DNS: 176.103.130.130
- Secondary DNS: 176.103.130.131
Step 4: Save and apply changes
Click Apply to save and finish the setup.
Additional tip:
Besides manual configuration, you can also download the AdGuard DNS software to enhance ad blocking, prevent tracking, boost loading speed, and customize your browsing experience. The software offers advanced settings suitable for both beginners and power users.
5. Guide to Setting Up AdGuard DNS on Mobile Phones
Configuring AdGuard DNS on your mobile device not only helps block ads effectively but also enhances security by preventing online threats. Below is a step-by-step guide to setting up AdGuard DNS on Android and iOS devices.
5.1. How to Set Up AdGuard DNS on Android
Android users can configure AdGuard DNS either through the app or manually, depending on their needs.
Method 1: Install via AdGuard App
Step 1: Download and install the AdGuard app from the Google Play Store. Once installed, open the app and go to Settings.
Step 2: Select DNS Filtering. Here, you can choose servers like AdGuard DNS or AdGuard DNS Family Protection to block ads and filter inappropriate content for children.
Step 3: Tap Use this server to activate the selected DNS on your device.
Method 2: Manual DNS Configuration
If you prefer not to install the app, follow these steps to configure DNS manually:
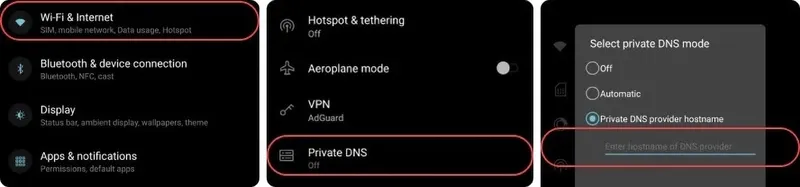
Step 1: Go to Settings > Wi-Fi.
Step 2: Select your current Wi-Fi network, long-press, and tap Modify Network.
Step 3: In Advanced options, change IP settings from DHCP to Static.
Step 4: Enter the following AdGuard DNS addresses:
DNS 1: 176.103.130.130
DNS 2: 176.103.130.131
Step 5: Tap Save to complete the setup.
You can choose either method to use AdGuard DNS and enjoy a safer, ad-free browsing experience on your Android device.
5.2. How to Set Up AdGuard DNS on iOS
If you're using an iOS device, configuring AdGuard DNS can enhance your security and protect your privacy while browsing the internet. Below are two simple methods you can apply directly on your iPhone or iPad.
Method 1: Set up via the AdGuard app
Step 1: Open the App Store, search for “AdGuard for iOS,” then download and install the app.
Step 2: After installation, open the AdGuard app and go to the Tracking Protection section. Enable the feature here.
Step 3: Next, go to DNS encryption, then choose either AdGuard DNS or AdGuard DNS Family based on your needs (ad-blocking or filtering inappropriate content).
Method 2: Manual DNS setup (no app required)
If you prefer not to install an app, you can manually configure AdGuard DNS through the iOS settings:
Step 1: Go to Settings on your iOS device.
Step 2: Select Wi-Fi, then tap the name of your connected network.
Step 3: Scroll to the DNS section, switch to Manual, and enter the following DNS addresses:
DNS 1: 176.103.130.130
DNS 2: 176.103.130.131
Step 4: Tap Save to complete the setup.
Installing AdGuard DNS is a simple yet powerful way to block annoying ads and protect your device from online threats. Whether you use the app or set it up manually, you'll enjoy a safer, smoother, and more private browsing experience.
Need help? Contact Hidemium Antidetect Browser for prompt and dedicated support!

Related Blogs

Which is the better choice for your online business—VPN or Proxy? While many people mistakenly believe that simply using a VPN to change their IP address is enough for security, major platforms can still easily detect shared IP ranges and blacklist associated accounts. The difference between data encryption (VPN) and dedicated IP rotation (Proxy) is often the line between smooth operations and[…]
.png)
Kameleo is one of the highly rated Antidetect browsers, supporting users to safely manage multiple accounts on the same device. Since its launch in 2018, Kameleo has attracted the attention of a community of users concerned about privacy and security of personal information online. So in 2025, will Kameleo still be a reliable choice? Let's go together Hidemium Explore details in the article[…]
CAPTCHAs are designed to distinguish humans from bots, but in the fields of automation and software testing, bypassing this layer of protection is sometimes a necessary requirement. Dedicated CAPTCHA solving services meet that need by combining the power of algorithms with global human resources.In this article, Hidemium will analyze and compare the four leading platforms today — 2Captcha,[…]

Affiliate marketing is currently one of the most popular and sustainable ways to make money online. Whether you are a beginner or a veteran, using the right support tools will help save time, easily manage campaigns and improve conversion efficiency.In this article, Hidemium will introduce 15 top affiliate marketing tools, divided into many groups: tracking & analytics, link management, SEO,[…]
.png)
Twitter, now officially rebranded as X.com, continues to attract millions of users with its real-time updates and user-friendly interface. While most users prefer accessing it through the mobile app, X/Twitter’s web version is an excellent tool for marketers and cross-border businesses to promote their brands and drive traffic.If you’re looking for a fast and simple way to log into X/Twitter on[…]
In the digital age, protecting personal information when accessing the internet has become an urgent need. Rent a VPN are increasingly being chosen by many people as a safe, flexible and budget-friendly solution. However, among a series of suppliers on the market, how to choose a cheap VPN service but still ensure performance, security and stability? Let's Hidemium Antidetect Browser Explore[…]
