When accessing the website, the browser reports an error “DNS server not responding”, which means your computer cannot connect to the DNS server to convert the domain name into an IP address. This is one of the common network errors that disrupts web surfing and affects user experience. In this article, Antidetect Browser Hidemium will help you understand What is DNS server not responding?, the cause of this error, and 15 effective solutions in just a few simple steps. Discover now to restore your Internet connection quickly and securely!
1. What is the error DNS server not responding?
Error “DNS server not responding” (DNS server not responding) occurs when your device cannot connect to the DNS server – the system responsible for converting domain names (e.g. google.com) into IP addresses that browsers can understand and access.
In other words, even though you entered the correct website address, the browser cannot load the website due to a problem with the DNS server or network configuration. This error is often accompanied by messages such as:
“DNS server is not responding”
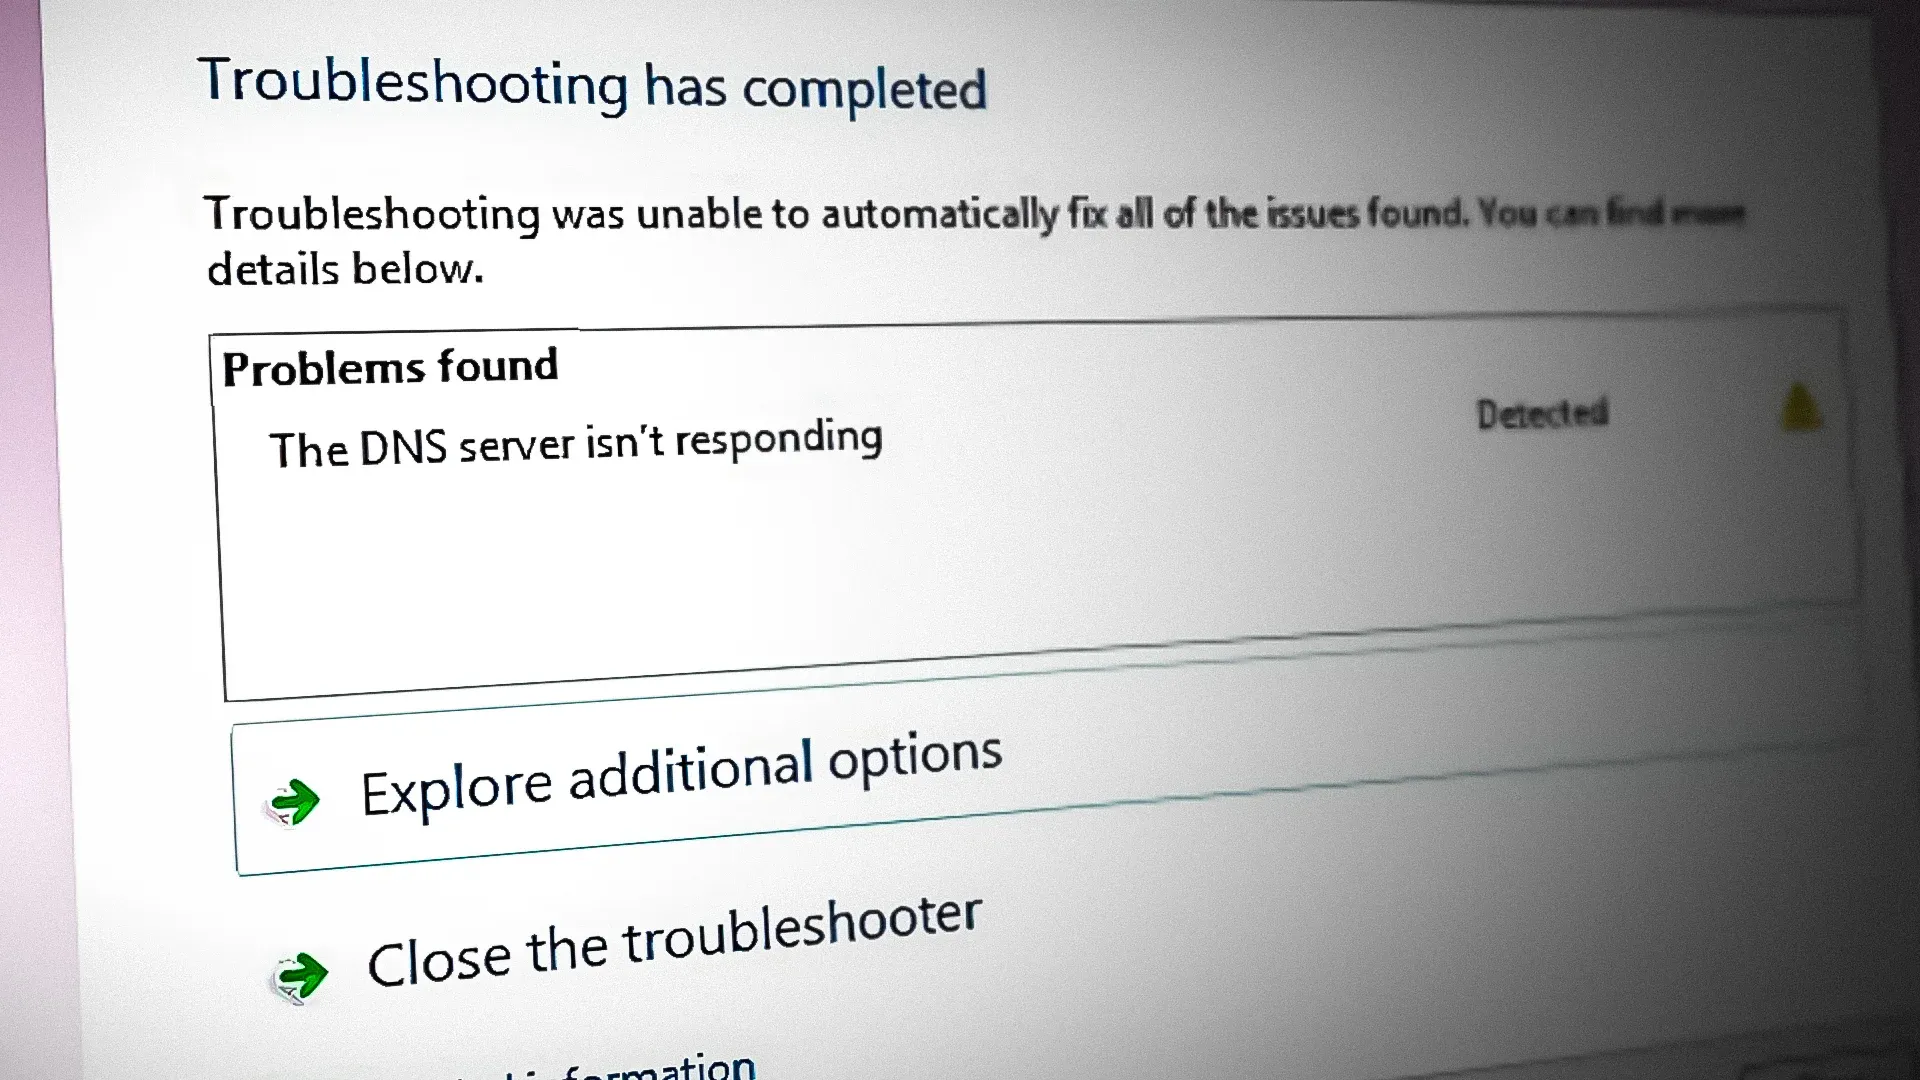
“The DNS server isn’t responding”
“DNS PROBE FINISHED BAD CONFIG”(on Chrome)
Error "DNS server not responding" is one of the common problems that prevent users from accessing websites. The reason is that the browser does not receive a response from the DNS server - the system that is responsible for converting domain names such as www.google.cominto an IP address that the device can understand and access. When this process is interrupted, an error message appears, preventing you from using the Internet as usual.
>>> Learn more: What is DNS 1.1.1.1? Easy guide to install & change DNS 1.1.1.1
2. Causes of DNS server not responding error
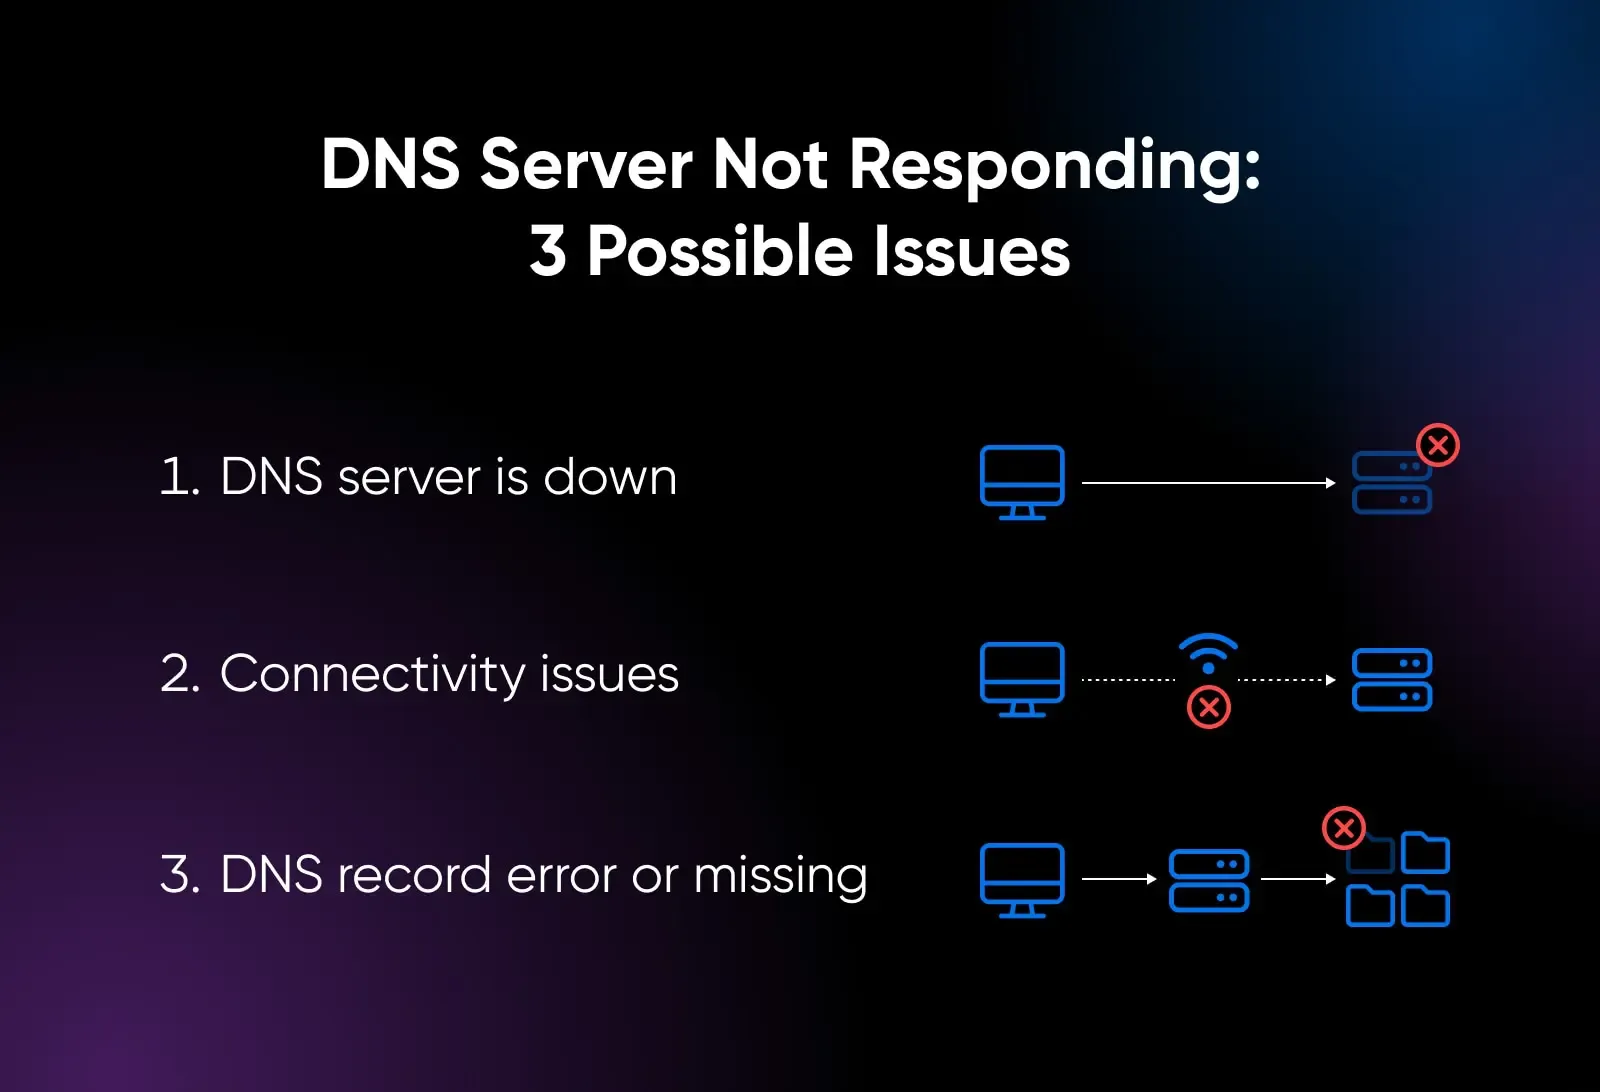
Error DNS servers not responding can be caused by a variety of reasons, both software and hardware related. Here are the most common reasons why a DNS server won't respond:
Unstable network connection: Internet service provider (ISP) issues, cable breaks, or weak Wi-Fi signals can prevent your device from sending requests to the DNS server.
DNS server is overloaded or having problems: The DNS server you are using (usually your ISP's) may be faulty, overloaded, or temporarily down.
Incorrect DNS configuration: Incorrect manual DNS address setup or software interference can cause the computer to be unable to connect to the correct DNS server.
Firewall or security software blocking the connection: Some antivirus, VPN, or firewall software may accidentally block DNS requests, resulting in connection errors.
Browser or operating system error: A faulty, out-of-date, or conflicting web browser or Windows/Mac system can affect DNS resolution.
Router or modem is not working properly: Network devices that have not been restarted for a long time or have software errors are also common causes.
Identifying the correct cause will help you choose the right and faster solution, avoiding wasting time trying many unnecessary solutions.
>>> Learn more:How to Fix "Network Blocking Encrypted DNS" Error on iOS
3. 15 effective ways to fix the error “DNS server not responding”
Depending on the cause of the “DNS server not responding” error, you will need to apply different fixes. Here are 15 simple but effective methods to help you handle this error quickly:
3.1. Try switching to another browser
If you can't access a particular website, it's likely that your browser is having problems. Try switching to a different browser – for example, if you're using Chrome and it's crashing, try Firefox or Firefox.
If the alternative browser works fine, you can try resetting the old browser. If that doesn't work, uninstall and reinstall it to restore its original functionality.
3.2. Restart your computer in Safe Mode
Starting the computer in Safe Mode is one of the simple ways to handle DNS errors that many people apply.
The steps are as follows:
Step 1: Click on the Windows icon in the bottom corner of the screen, move the mouse to the buttonPower.
Step 2: Hold down the keyShift, then pressRestart.
Step 3: In the new window that appears, selectTroubleshoot > Advanced Options.
Step 4: ClickStart-up Settings, then selectRestart.
Step 5: At the new options interface, select or to enter Safe Mode as needed.
Note: If you are using Windows 7 or earlier, simply restart your computer and hold down the F8 to enter Safe Mode.
3.3. Change Network Address
A fairly effective method to fix the DNS not responding error is to adjust the Network Address as follows:
Step 1: Press keyStart, open dialog boxRun.
Step 2: AccessNetwork and Sharing Center, select Change adapter settings.
Step 3: Right click on the network connection in use >Properties.
Step 4: FindInternet Protocol Version 4 (TCP/IPv4)and change DNS as follows:
Preferred DNS server: 8.8.8.8
Alternate DNS server: 8.8.4.4
Step 5: TickValidate settings upon exit then pressOK.
Step 6: Enter Start > Run, entercmd.exe, then pressEnter.
Step 7: Enter commandipconfig /allto get informationPhysical Address.
Step 8: Return Network and Sharing Center > Advanced > Network Address, enter the address you just wrote down, then pressOK.
3.4. Reset DNS
If you have changed the Network Address but still get the error DNS server not responding, try resetting DNS to default. This helps fix problems caused by misconfiguration or DNS conflicts.
Follow these 3 steps:
Step 1: Press Windows + R, enter cmd.exe, then press Enter to open Command Prompt.
Step 2: Enter the following commands in turn, pressing Enter after each command:

Step 3: Restart your computer to apply changes.
💡 Note: The above commands will clear the DNS cache and return DNS settings to default, making the system more stable.
3.5. Restore Winsock Registries
Adding or restoring keys Winsock Registry may be an effective solution to the error DNS server isn’t responding.
How to do it:
Step 1: Press Windows + R, enter regedit, then Enter to open Registry Editor.
Step 2: Access in turn by following the path:

Step 3: Right click on the item Winsock, select Export, name and save the backup Registry file.
Step 4: Restart your computer.
Step 5: Reopen Registry Editor, select:

then find the previously saved Registry file and select Open.
Step 6: Restart the device again.
This will reset the network settings to default, which should help resolve any DNS or Winsock related internet connection errors.
>>> Learn more: What is Chrome net internals DNS? How to clear DNS cache in Chrome
3.6. Disable NetBIOS
Although NetBIOS is not a common cause of errors DNS server not responding, but the disable NetBIOS can help improve connectivity in some cases, especially when you're not using a home or business network.
Steps to follow:
Step 1: Enter Control Panel → Network and Internet → Network and Sharing Center.
Step 2: Double click on the network you are using, select Internet Protocol Version 4 (TCP/IPv4) → Properties.
Step 3: Select Advanced → tab WINS→ tick Disable NetBIOS over TCP/IP.
Step 4: Click OK and close all windows.
Disabling NetBIOS is an advanced option that is not always necessary, but is useful if you suspect NetBIOS is interfering with DNS connectivity.
3.7. Restart the system – Quick solution for DNS error
Restarting your computer is a simple yet effective way to fix the “DNS server isn’t responding” error on Windows operating systems. When the system is restarted, all settings and resources will be reloaded, making the computer more stable and eliminating minor errors, including problems related to the DNS server.
3.8. Turn off firewall and antivirus software – Check the cause of connection blocking
Firewalls and antivirus software can sometimes interfere with network connections, leading to DNS server errors. To check if this is the cause, you can temporarily disable your security programs as follows:
Step 1: Open Control Panel from the search bar.
Step 2:Select item System and Security.
Step 3:Click Windows Defender Firewall.
Step 4: Select Turn Windows Defender Firewall on or off, then turn off the firewall and press OK to confirm.
3.9. Clear DNS Cache – Refresh network system memory
DNS Cache helps store the IP addresses of websites you visit to speed up future access. However, if this cache becomes corrupted, it can cause connection problems. Clearing the DNS Cache will refresh your system and fix DNS errors.
Do as follows:
Step 1: Enter cmd into the search bar and run Command Prompt under administration.
Step 2: Type command ipconfig /flushdns then press Enter to clear DNS Cache.
3.10. Update network driver – A step not to be missed
Network drivers play an important role in connecting to the Internet. If your drivers are outdated or out of date, your computer may experience problems accessing the network, including DNS errors. To update your network drivers, follow these steps:
Step 1: Open Control Panel, then select Device Manager.
Step 2: Expand section Network Adapter by clicking on the triangle icon.
Step 3: Right click on the network device in use and select Update Driver to update.
>>> Learn more: What is Flush DNS? How to clear DNS cache on computer and browser
3.11. Reset and update the Router
If you have tried all the previous methods and the "DNS server not responding" error is still not resolved, try powering off your router for a few minutes, then powering it back on and checking the connection.
If the problem persists, you should proceed to reset the router. The reset button is usually located on the back of the device, near the power button and is recessed. Use a toothpick or small pin to press and hold this button for about 20 seconds, until all the lights on the Router flash and then turn off. Then:
Access the Router setup interface via the IP address printed on the bottom of the device.
Enter your username and password (also printed there).
Perform a router reset according to the manufacturer's instructions.
Note: If the DNS error persists after resetting, you may consider upgrading your Router's firmware to the latest version.
3.12. Adjust TCP/IP settings
TCP/IP is the underlying protocol suite that helps devices connect to the Internet. To adjust TCP/IP on Windows, follow these steps:
Open Control Panel, select Network and Internet.
Click Network and Sharing Center, then select Change adapter settings on the left menu.
Right click on the WiFi network you are using, select Properties.
Double click on the item Internet Protocol Version 4 (TCP/IPv4).
Select:
Obtain an IP address automatically
Obtain DNS server addresses automatically
Press OK to save changes and restart the device.
This helps the system automatically get the appropriate IP address and DNS, improving network connectivity.
3.13. Turn off unused secondary connections
Another way to deal with DNS errors is to disable unnecessary secondary network connections that are running in parallel on your device.
For Windows:
Open Control Panel → Network and Internet → Network and Sharing Center.
Select Change adapter settings in the left column.
In the list Network Connections, look for the sub-connections with a red (X) icon.
Right-click on each unused connection, select Disable.
Restart your browser to apply changes.
For macOS:
Access Apple menu → System Preferences → Network.
In the left column, select each sub-connection.
Click the minus (-) icon at the bottom to delete that connection.
Once you have turned off all secondary connections, restart your browser and try accessing the website again.
Suggest: Disabling unused connections helps avoid network conflicts, improves access speed, and reduces the likelihood of DNS errors.
3.14. Disable Windows Peer-to-Peer feature to handle DNS errors
When an error occurs DNS server not responding on Windows 10 and turning off the firewall or changing the network connection doesn't work, you can try another way: Disable Peer-to-Peer (P2P) feature.
This feature allows a device to download Windows updates once and then share them with other devices on the same local network, saving bandwidth. However, in some cases, it can interrupt the DNS resolution process, causing network connectivity errors.
Instructions to turn off Peer-to-Peer:
Step 1: Click the Windows icon and access Settings.
Step 2: Select item Update & Security.
Step 3: Click Delivery Optimization in the left menu.
Step 4: Disable option Allow downloads from other PCs.
Once done, restart your computer and check if the error is fixed by visiting any website.
3.15. Prioritize Ethernet connection over WiFi
If you are using WiFi and get DNS error, try switching to using Ethernet connectionby plugging the network cable directly into your computer. If you are using Ethernet, unplug the cable, wait about 30 seconds, and then plug it back in to refresh the connection.
If the connection works fine after switching to Ethernet, this indicates that your WiFi router may be having problems. In that case, you should restart wifi router or reset network configuration to ensure stability.
Error DNS server not responding is a common problem but can usually be easily fixed if you apply it correctly. Hopefully with the 15 methods shared in the article, you will thoroughly handle the disconnection situation. If you still have problems, please contact Hidemium for fast and professional support.
>>> See related articles:

Related Blogs

In the SEO space, many businesses and agencies build blogging strategies from scratch, focusing on optimizing website rankings through quality content. However, a common challenge is Manage multiple Ahrefs accounts for multiple clients or share access that no additional user fees for Ahrefs.Hidemium who share how Share Ahrefs account safely, comply with terms and avoid the risk of being locked[…]
In a network system, MAC address and IP address Both serve to identify devices, but they perform completely different functions. Understanding the difference between these two types of addresses not only helps you manage your network better, but is also key to ensuringinformation security – especially for those working in the field Cyber Security or digital marketing.Let's go together Hidemium[…]

GoLogin is the one Antidetect browser long-standing and reputable, outstanding with the ability to protect personal identity and enhance privacy when accessing the Internet. Thanks to the ability maintain anonymity, GoLogin is trusted by the MMO community and professional users for secure multi-account management.However, in the context of 2025 with the appearance of many competitors possessing[…]

Phần Mềm Antidetect Browser Giúp Tăng Hiệu Quả Kiếm Tiền Online Từ Affiliate Marketing

Have you ever wondered why many Amazon sellers are able to generate more revenue? $10,000 per month? In fact, they are not smarter than you, they just know how to Safe business expansion. While most sellers are limited to a single account and struggle to grow, successful ones leverage Multiple Amazon Accounts to capture niche markets and maximize profits.The problem is, Amazon AI system are[…]

In 2025, the need to manage multiple accounts on platforms like Facebook, Amazon, or TikTok is increasing, especially for affiliate marketers, e-commerce shop owners, and digital advertising experts. Indigo Browser, an antidetect browser aimed at the Russian market, was noted for its simple interface and basic fingerprinting capabilities. However, with limitations in performance, features, and[…]
